How to Create & Translate Captions and Subtitle Files for Video and Audio (AVCS)
Updated January 23, 2025
When you have videos or audio files like podcasts, spf.io can help you make them accessible by generating transcripts or captions, and even translating them into other languages.
Jump to section:
- Upload media and generate transcript
- Review and edit transcripts/subtitles
- Translate documents
- Export and share files
First, we’ll need to upload the video or audio file and generate the transcript.
Then we’ll need to review the transcript, populate the ARDB and edit the primary language for accuracy.
Then we’ll discuss next steps with the document–whether that’s generating translations, exporting a subtitle file or sharing the transcript.
Upload Media and Generate Transcript
1. Go to Resources > Media.
2. Click Upload media.
3. Set the primary channel for the spoken language in the file.
Note: if you want to translate your subtitles, that happens at a later step. Pick the original language in this step.
4. Switch on the Generate transcript toggle.
5. Upload the audio or video file. This may take a few minutes if it’s a large file. Once it’s finished uploading, you’ll see the file name in the list.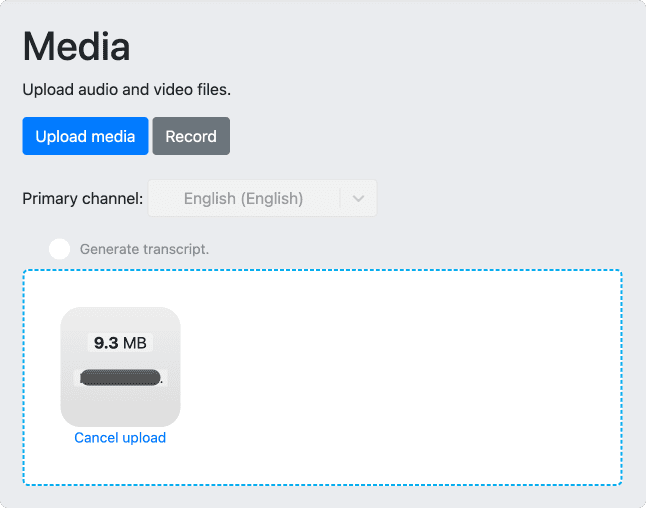
6. Click on the file name to view it.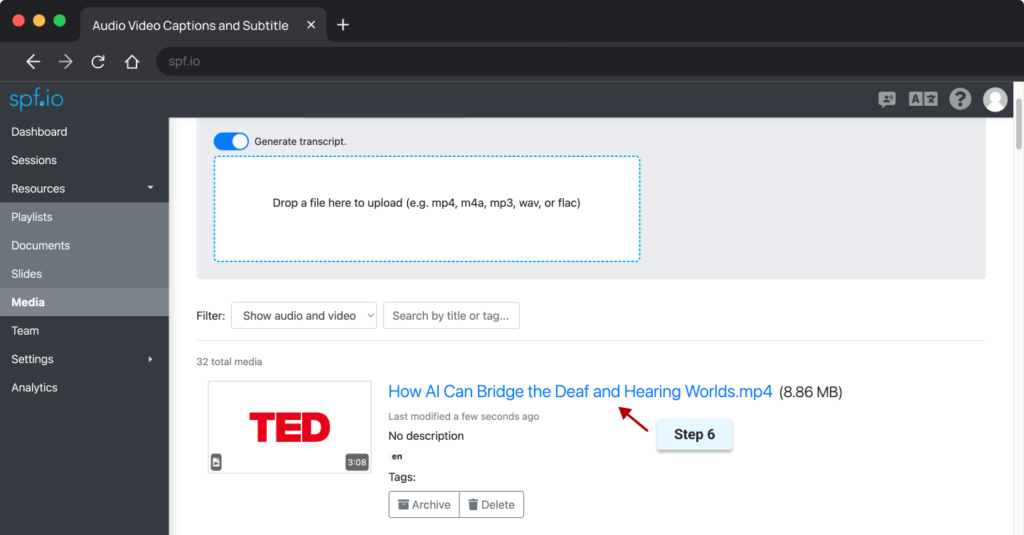
7. Click the Transcribe button to generate the transcript.
Review Transcript/Subtitle File
1. Review the initial transcript for mistakes. This is a two-step process. First, look at the paragraph below the video. For phrases or names that are picked up incorrectly, you can create autoreplacements. That way, they will automatically apply when we go to edit the document later.
New Feature: You can now apply autoreplacements from within the document editor, which is a more powerful and flexible interface. The below steps still work, but if you wish to use the new feature, skip to step 6 and then follow the instructions in this video.
2. To create an autoreplacement, identify a phrase or word that needs to be corrected. You want it to be unique enough that it won’t apply overzealously. Click on the Autoreplacements icon.
3. On the left-hand side, enter the CORRECT version of the word or phrase, then press Enter.
![]()
4. In the right-hand side input, enter the INCORRECT versions of the word or phrase, then press Enter.
![]() 5. Repeat these steps as needed.
5. Repeat these steps as needed.
6. Now, we will see these autoreplacements applied as we edit in the document editor. Click on Edit and select if you want to Edit as transcript OR Edit as subtitle. The difference between these two is that the subtitle file breaks out utterances with timestamps, while the transcript displays just the text.
Important Note:
- If you plan to export the subtitle file as a .srt file type, select “Edit as subtitle.” Otherwise, you will lose your timestamps and not be able to use them for captions.
- It’s important that you ONLY edit the caption text, NOT the timestamps or sequence numbers.
7a. Play back the media and make edits as you go. You can drag the media player around to see the text behind it.
7b. With subtitle file documents, you can click the subtitle number, and the file will automatically play that snippet. You can edit, delete, and flag particular subtitles that need to be corrected.
7c. If you find a subtitle that is not split perfectly, for example, the subtitle line is too short, you can combine it with the previous subtitle by clicking the Merge up button. This ensures the subtitles can be merged without changing the timestamp.
Example (before the merging):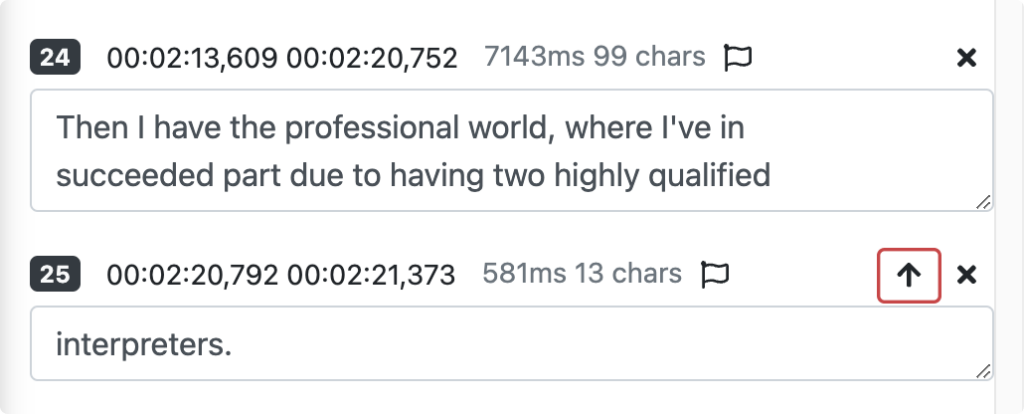
The result:
7d. You can also split the subtitles without changing the timestamp. First, play the media by clicking the subtitle number or pressing Ctrl + [ on your keyboard. Then, when you arrive at the part you want the subtitle to be split, press Ctrl + = to split it.
Example (before splitting):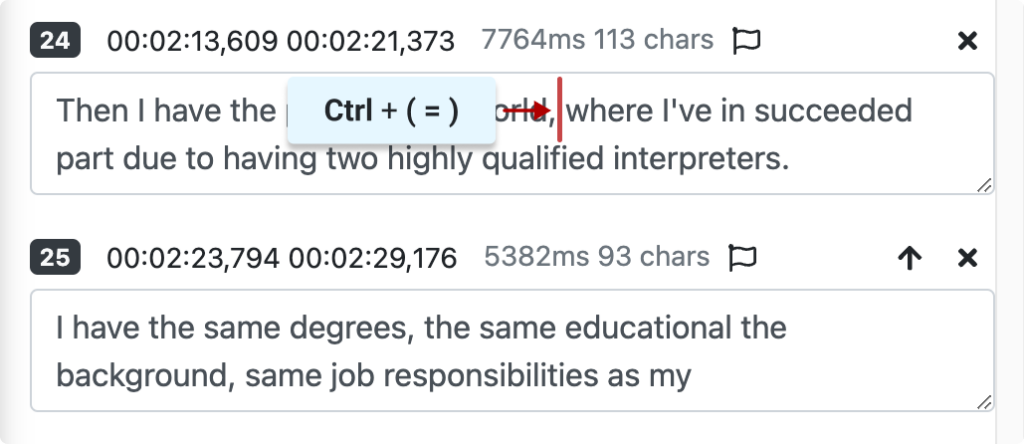
The result: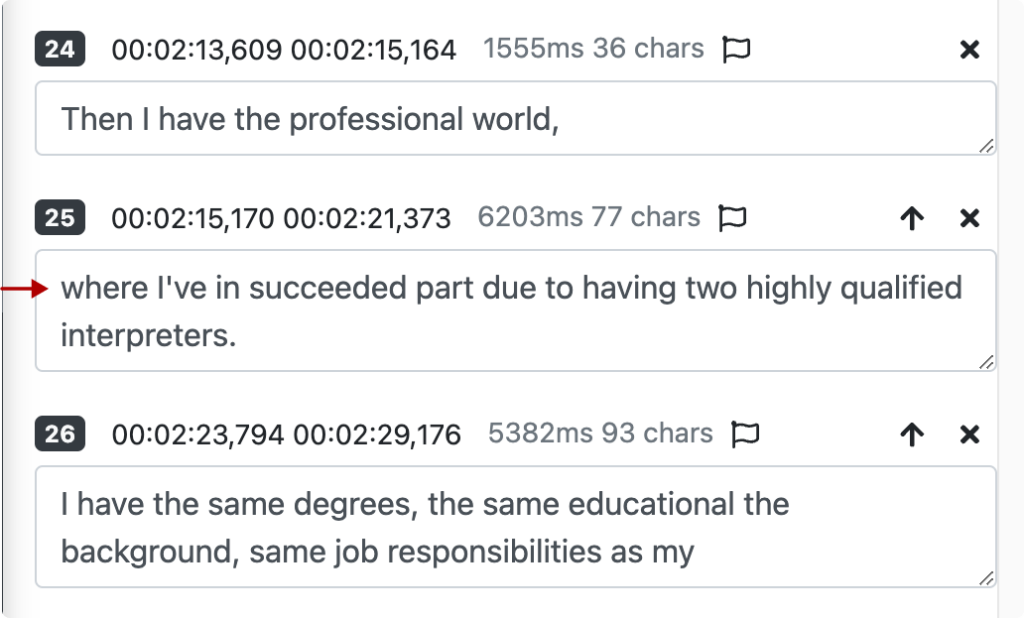
Note: If you need to adjust when the subtitle starts and ends, click the timestamp and edit it as needed.
8. Click the Save button to save your changes.
Next Steps
Next, there are a few different ways we can go: generate translations of the transcript or download the document in the correct format (whether that’s the .srt subtitle file or as a PDF of the transcript).
Generate Translations
You can generate automatic translations with spf.io. Note that translating a transcript will yield better results than a subtitle file, as the text is not broken into incomplete utterances.
1. In the document editor, click the Translation button at the top to add a translation.![]()
2. Select the language into which you want to generate the automatic translation and ensure to switch on the Request automatic translation toggle. Click the Add translation button.![]()
3. The translation will appear on the right side of the screen. Review it and make edits as needed.
Export a Transcript or Subtitle File
1. Click the Download button to export the .txt transcript file or .srt subtitle file in your target language. If you only want to download the transcript file in the source language, you’ll receive the DOCX file. It will be saved to your downloads folder.
2. Upload this .srt file to your video hosting platform so the subtitles are viewable with your video.
Share a Transcript File
1. You can share the transcript by clicking the Preview button.
Then you can either copy/paste the text or save as PDF.
To copy/paste the text, click the Copy to clipboard button and paste the transcript wherever you wish to store it.
To save as PDF, click Print and then save as PDF.