
Learn how to caption and translate your Vimeo videos
- Use OBS with spf.io to add live captions to Vimeo live streams
- Use spf.io to quickly translate and add Vimeo subtitles for all your content
- Upload caption and subtitle files to recorded content in Vimeo’s Advanced Settings
Now more than ever, it’s important to add captions and subtitles to your Vimeo account. In addition to meeting accessibility standards, you will increase your reach and viewer engagement. This article will show you the tips and tricks that will make captioning and subtitling videos on Vimeo quick and easy.
Vimeo subtitles and captions for livestreams – what software should I use?
You can add Vimeo subtitles to any of your livestreams using OBS and spf.io. (This also works for Twitch, Facebook, and YouTube livestreams – see our how-to tutorial on how to add live captions and subtitles here!)
OBS is a free, open-source software that lets you livestream or record with more than one input.
Spf.io is a web-based translation and accessibility software for events and content. In spf.io, you can quickly produce and manage multiple caption / subtitle files, transcripts, and translated content. Spf.io’s custom tools help you batch-edit your files while improving the quality of future transcripts and translations, using human-centered artificial intelligence to save you time and money. With spf.io, you can choose to use human interpreters, machine-generated translation (and text-to-speech), or a combination of both human and AI captioning and translation.
Time-saving features in spf.io
Captioner Autoreplacements
Want to spell a name/word a specific way every time? Tell spf.io to replace incorrectly captured names, words, and phrases with the version you want.
Translator Autoreplacements
Gain control of your subtitles. With spf.io, you can define how you want unique words/phrases to be translated for more accurate subtitles and translations.
fastSRT
One of our favorite cost-efficient tools for captioning VOD (video on demand)! Save the timing of your live captions to make accessible on-demand content/recordings available immediately after your livestream. Avoiding doing your work twice by using the same Vimeo subtitles in both your livestreams and recordings.
TUTORIAL: OBS / spf.io / Vimeo setup for captioning livestreams (click to expand)
- This assumes you have a spf.io session created and OBS installed with the OBS Websocket plugin.If you haven’t yet, sign up for spf.io here, and install OBS here. The OBS Websocket plugin enables spf.io to communicate with OBS.
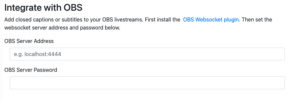
- Configure your OBS integration in spf.io:Go to Settings -> Integrations -> OBS and set the OBS Server Address and Password you set up in Step 1.
- Set up your spf.io overlays (captions will show over the video):
-Click on the overlay symbol and go to Integrations: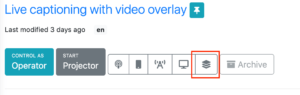
-Enable ‘send captions to OBS’: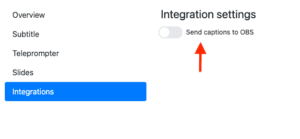
- In OBS, go to > Settings > Stream > Service > select Vimeo. Copy and paste the streamkey from Vimeo to OBS Stream.

Why add closed captioning to your Vimeo livestream?
- Reach more people – When your content is multilingual and accessible, you can reach international Vimeo users. Use spf.io’s language tools to quickly create machine-generated subtitles and captions. If you have a script produced by a human translator, you can upload that to spf.io, releasing the lines as you speak them for perfectly synced Vimeo subtitles.
- Make your content more valuable – Subtitles allow viewers to understand your video even when they are playing your content without sound, which is increasingly popular with many more users playing media on their cell phones. It also helps people find the information they need more quickly when they can see captions and subtitles. This is especially important for adding value to your content if you’re considering selling SVOD (subscription video-on-demand). As a bonus, you can support your subscribers by offering transcripts alongside your content (transcripts are easily converted from captions/subtitles with a click of a button in spf.io).Additionally, Vimeo subtitles and captions are also useful for helping search engines rank your content higher. You can even create articles from your transcripts to help draw visitors to your website or social media profile.
- Increase viewing time – When captions and subtitles are made available, people generally continue watching videos for longer periods of time. This gives them time to like, react, and comment on your video.
Saving your livestream captions in Vimeo with spf.io
What you get:
-Downloadable captions as .srt, .txt, or .vtt files (Vimeo prefers .vtt formats for captions and subtitles)
How it works:
When you release Vimeo subtitles or captions using spf.io, spf.io saves your session history. After your livestream, you can access your session history and see that it includes the timing and content of your subtitles. If you want to change your subtitle timings for any reason, save your history as a spf.io subtitles document and easily make these edits in spf.io.
When you have finalized your document, download your content as a subtitles file (fastSRT). You can choose a few different formats for your subtitles file, but Vimeo recommends VTT as the preferred format..,
With spf.io, you can even add additional translations after your live event to make your VOD multilingual.
How do I upload my subtitle files to Vimeo?
See more detailed Vimeo accessibility instructions here.
- In Vimeo, go to the video you want to add captions or subtitles to.
- Edit your video’s settings. Click on Advanced settings >> Distribution >> Subtitles
- Click on the (+) plus sign next to “Captions and subtitles.”
- Upload your .vtt file with a recognizable title like “Spanish subtitles.”
- Make sure to click on the slider to activate each subtitle file! Subtitles will show if the slider is highlighted blue.
- Save changes.
Now, viewers can see your subtitles by clicking the “CC” button in the lower right-hand corner of your video.
Want help getting accurate captions and subtitles for Vimeo, YouTube, Hopin, and more? Get in touch with us to see how we make it easy for our customers!