
How to Setup spf.io for Livestreaming Audio Interpretation
Updated June 6, 2026
When you have a volunteer who can provide live spoken interpretation, spf.io will help you to distribute the translation so audience members can easily get translation on their own device–no headset equipment required! All an attendee needs is a smartphone and headphones. Follow these steps for the spf.io audio interpretation setup.
On-site Interpreter Use Case
Equipment Needed:
- Laptop running Google Chrome
- Reliable (ideally wired) internet connection
- A microphone connected to the laptop for the interpreter to speak into (don’t use a laptop’s built-in microphone unless you are in a separate room, it picks up background noise very easily!)
Setup Instructions if Interpreter is On-Site:
1. Set up your laptop with a microphone and reliable internet. To avoid wi-fi connectivity issues, this would ideally be a wired ethernet connection. However if that is not available you may use your cellphone as a mobile hotspot.
2. Log into spf.io and locate the correct session. If none, click on Create Session. Enter a title for the session. Under languages, select the language that will be spoken up front and the language that you will be interpreting into. Then scroll down and click Create new session.
3. Configure Audio & Connections. Before opening the Streamer, configure how your audience will listen:
-
- Go to your session and click Options.
- Navigate to Audience Audio Settings.
- Choose which languages to broadcast using the table:
– For all languages: Select the Streaming radio button at the very top of the column.
– For specific languages: Select the radio button in the Streaming column that corresponds to the specific language row you want to broadcast (e.g., English, Español, Bahasa Indonesia). - Next to the top “Streaming” label, input the maximum number of audience connections you want to allow for the stream.

4. Open the Streamer for the session.

5. Set Channel & Start Streaming
a. Choose your interpretation language from the pop-up for first-time access, or simply ensure the correct channel is already displayed on the screen if you have accessed it before (e.g., EN for English).
b. Once the channel is correct, press the large Microphone icon (Click to start) to begin streaming audio.

Tip: For optimal performance—whether your device starts lagging with as few as 10 connections, or you are hosting a large event with hundreds of attendees—you can activate the Audio Livestream Scaler by following these steps:
a. Click on the Listeners section.
b. Use the slider to adjust the number of connections you need.
c. Click Turn on Scaler, then click OK.
d. Set the duration (in hours), the interpretation language, and the maximum number of audience members needed. Wait a few minutes for the Scaler to activate.
e. Once active, click OK. Your Audio Livestream can now support your requested number of connections.

Note: When you are finished interpreting, return to the Listeners section and suspend your Audio Livestream Scaler. If you forget to do this, it will automatically turn off once your set duration ends.
6. Grant Access & Test Audio
a. Grant the browser permission to access your microphone and select the correct input.
b. Speak into the microphone and check the audio visualizer on the screen to confirm it is responding to your audio feed.

7. Test to confirm the translation is accessible to the audience by visiting <yoururl>.spf.io/z on a smartphone. Select the language you are interpreting into and click on the audio icon to enable and hear the audio livestream come through.

If you do not hear the audio coming through, check if the /z shortcut is pointing to the correct session. Click on Sessions in the menu. Next to the session you’ve created, see if the pin icon is highlighted. If it is not, click on the pin to point the /z URL shortcut to this session.
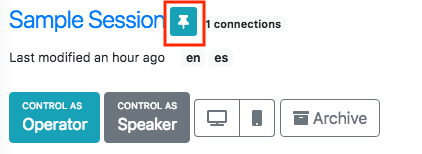
8. Share the spf.io URL with attendees that need translationand show them how to get setup and listen to the audio interpretation. Then you’re ready to go with live spoken interpretation!
Remote Interpreter Use Case
Equipment Needed:
- On-site Laptop running Google Chrome
- Reliable (ideally wired) internet connection
- Venue soundboard connected to the on-site computer
- Interpreter’s laptop with headphones and microphone (you may use the laptop’s built-in microphone for remote interpretation)
On-site Setup for Remote Interpretation:
1. Connect the on-site laptop with venue soundboard so that the spoken audio is a microphone input into the laptop.
2. Then, follow the same steps in the “On-site Interpreter Setup“.
For Remote Interpreters:
1. Set up your laptop with a microphone and reliable internet. To avoid wi-fi connectivity issues, this would ideally be a wired ethernet connection. However if that is not available you may use your cellphone as a mobile hotspot.
2. Log into spf.io and identify the session that you will be interpreting for. In the menu on the left-hand side, click on Sessions. You will see a list of created sessions, click on the session title for your event.
3. Adjust Audience Connections (If Needed)
-
- If you need to add or reduce the audience connection limits, click Options and navigate to Audience Audio Settings.
- Adjust the number of connections in the input box next to the “Streaming” label as necessary. (Remember to use the Audience Scaler via View Powerups if you need more than 100 connections).

Important: If you make this adjustment in the middle of an event, you must turn off and then turn back on the microphone in the Streamer page for the changes to take effect.
4. Open the Streamer for the session.
5. Set Channel & Set to Interpreter Mode.
a. Ensure that the channel is set properly (i.e. if you are providing Spanish interpretation, it should be set to ES).
b. Enter the Interpreter mode by clicking on the Interpreter icon in the bottom right-hand corner.

6. Plug in headphones to the laptop and enable Stream source audio to be able to listen to the venue’s sound for interpretation. Ensure that the channel it is listening to is the source channel—meaning the spoken language at the event.

7. Click the microphone icon to start streaming audio. It may ask you to grant access to the microphone, click “Allow.” Check the audio visualizer to confirm audio is coming through. Speak into the microphone and see the visualizer respond to the audio feed.

8. Test to confirm the translation is accessible to the audience by visiting <yoururl>.spf.io/z on a smartphone. Select the language you are interpreting into and click on the audio icon to enable and hear the audio livestream come through.
Depending on the internet connection, it may take up to 10 seconds for the audio connection to successfully go through. If you do not hear the audio coming through, check if the /z shortcut is pointing to the correct session. To do this in spf.io, click on “Sessions” in the menu and see the full list of sessions. Next to the session you’ve created for your event, see if the pin icon is highlighted in blue or green. If it is not, click on the pin to point the /z URL shortcut to this session. Once it is highlighted, re-enter the <yoururl>.spf.io/z URL on your smartphone and confirm it is pointing to your session.